Build an AI-ready PIPER arm simulation on Genesis with ROS and RViz. Learn the setup, pitfalls, and how to extend it for smart automation.
Simulate & Control the PIPER Arm on Genesis (ROS + AI)
ROS Noetic went end-of-life in 2025, and that’s forcing a healthy conversation in robotics teams: are you building a simulation-and-control pipeline you can carry into the next 2–3 years, or are you stitching demos together that will be painful to migrate?
The PIPER single-arm walkthrough shared by AgileX Robotics on the Genesis Simulation Platform is a good example of something many teams need right now: a reproducible way to get a real industrial-style arm model moving in simulation, visualized in RViz, and controllable through ROS. That matters for more than “cool demos.” It’s how you create safe, fast iteration loops for AI in robotics & automation—the kind of loop you need before you let any learned policy near a production cell.
Below, I’ll turn that original guide into a broader, production-minded playbook: what to install, how the pieces fit, what tends to break, and how to extend this workflow into an AI-ready single-arm robotics simulation pipeline for manufacturing and logistics.
Why single-arm simulation is the fastest way to de-risk automation
If you’re doing smart manufacturing or warehouse automation, a simulated arm is your cheapest failure. The reality is that most single-arm projects don’t fail because the robot can’t move—they fail because the integration loop is too slow.
Here’s what simulation buys you immediately:
- Control validation before hardware time: You can test joint limits, trajectories, and controller gains before you burn lab hours.
- Repeatable experiments: AI training and regression tests need the same scenario replayed hundreds or thousands of times.
- Safer iteration: Mistakes are expected when you tune motion planning, IK, or learned behaviors.
And here’s the key bridge to AI: simulation is where you generate and curate the data—for imitation learning, reinforcement learning, calibration of vision-to-grasp pipelines, or even simple anomaly detection on joint torque signatures.
The Genesis + ROS architecture (what’s actually happening)
Genesis is acting as the physics/simulation runtime, while ROS is acting as the integration bus and tooling layer. In the shared setup, you’re effectively splitting responsibilities:
- Genesis (Python): runs the simulated world and the PIPER arm dynamics, then accepts control commands.
- ROS (Noetic in the original post): provides nodes for kinematics, visualization in RViz, and command messaging.
- RViz: gives you interactive markers so you can “drag” an end-effector target and see the robot respond.
A simple mental model:
- RViz interactive marker updates a desired pose/goal.
- A kinematics node (IK) converts that goal into joint targets.
- A control script bridges those joint targets into Genesis and steps the sim.
That pattern is exactly what you want if you plan to add AI later. Your AI component can replace (or augment) step 2, step 3, or both.
Where AI fits cleanly in this pipeline
AI should sit behind stable interfaces. In practice, I’ve found three “swap points” that keep systems maintainable:
- AI-assisted IK / motion generation: model outputs joint targets or end-effector deltas.
- AI policy control: model outputs low-level actions (e.g., joint velocity commands) at a fixed control rate.
- AI perception-to-pose: model outputs object pose/grasp candidates; the rest of the pipeline stays classical.
Even if you’re not training yet, building the simulation pipeline now means you can add AI later without re-architecting everything.
Reproducing the PIPER single-arm setup (and keeping it sane)
The fastest path is to mirror the original steps, but put guardrails around environment management. The RSS post uses ROS Noetic + catkin_make plus a separate conda environment for Genesis. That split works, but you need to be disciplined about sourcing and activating.
Step 1: Build the ROS workspace and kinematics
The original guide installs Eigen and ROS conversions, then builds the agilex_genesis_demos workspace:
- Install dependencies such as
libeigen3-devand ROS Eigen conversion packages - Clone the demo repository
- Build with
catkin_make
Why Eigen matters here: kinematics calculations (FK/IK) are matrix-heavy. Eigen is the de facto standard for this in C++ ROS stacks.
Practical tips that prevent the usual headaches:
- Keep one workspace per robot integration when you’re early-stage. Mixing “random ROS stuff” into the same workspace is how builds get flaky.
- Pin your ROS distro inside a container if this is headed toward a team project. Noetic EOL means you’ll eventually migrate; containers make that controlled.
Step 2: Install Genesis in an isolated Python environment
The post uses:
conda create -n genesis python=3.10pip install genesis-world
That’s sensible. Genesis requires a recent Python (>=3.10 in the post’s note). The important discipline is: don’t let your ROS Python path bleed into your simulator environment.
If you want fewer conflicts, treat it like this:
- ROS environment = terminal A (sourced)
- Genesis environment = terminal B (conda activated)
Yes, it’s slightly annoying. It’s also stable.
Step 3: Bring up kinematics, visualization, then simulation control
The original launch sequence is (in order):
- Source the ROS workspace
- Launch IK
- Launch RViz visualization
- Activate conda env and run the Genesis control script
This ordering matters because RViz and IK are “listeners/producers” that you want ready before the simulator starts consuming commands.
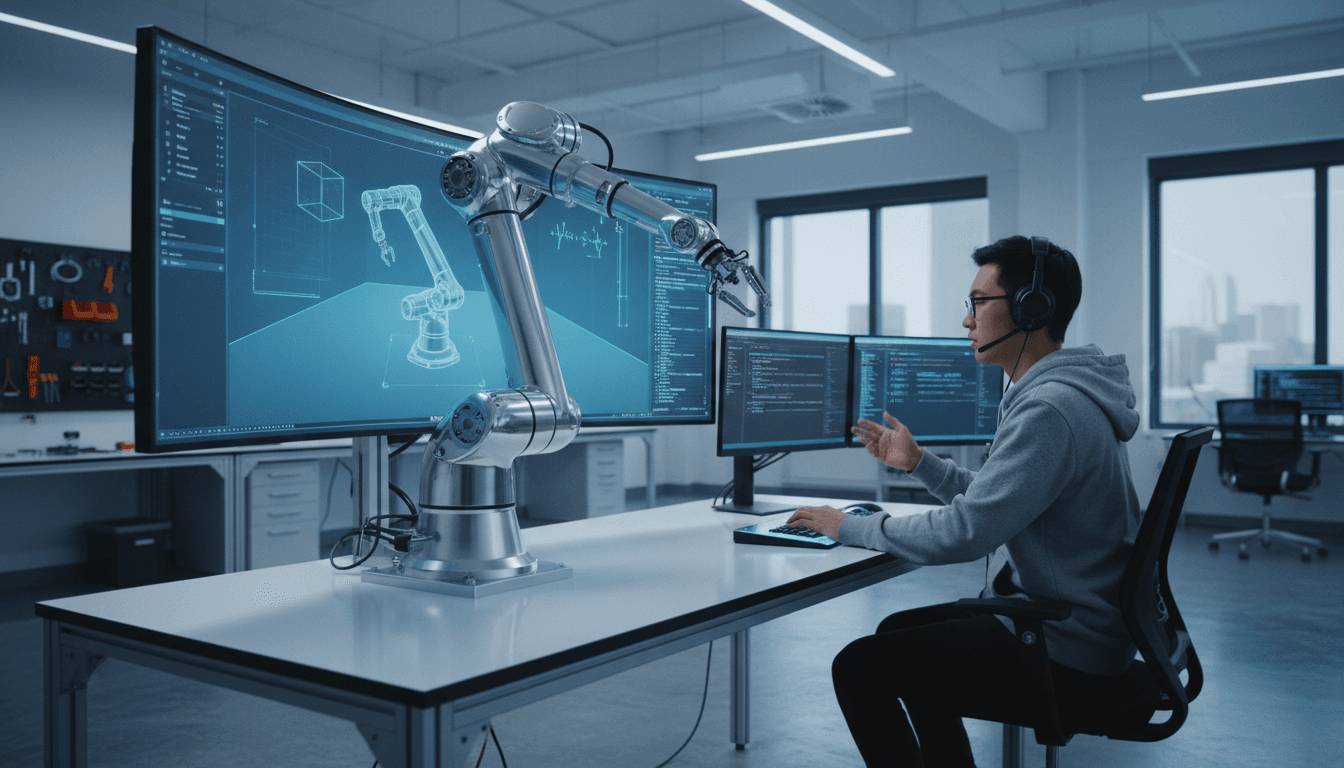
Step 4: Control with RViz markers
The screenshot in the post shows the common workflow: use an RViz interactive marker to move a goal, then watch the arm track it.
This is more than convenience:
- It’s a human-in-the-loop testing tool for reachability and singularity zones.
- It’s a fast way to validate IK stability (you’ll see jumps when solutions flip).
- It’s a decent “operator interface” baseline that can later be replaced by AI.
What tends to break (and how to fix it quickly)
Most failures happen at the boundaries: ROS↔Python, message rates, and frame conventions. Here are the repeat offenders.
1) Environment mismatch: ROS Python vs conda Python
Symptom: imports fail, nodes run in one terminal but not the other.
Fix pattern:
- Keep ROS nodes running under the system/ROS Python.
- Keep Genesis under conda.
- Communicate strictly over ROS topics/services (or a clean bridge), not shared Python packages.
2) Frame confusion: RViz looks right, control looks wrong
Symptom: the marker moves “forward” but the arm moves sideways or rotates oddly.
Fix pattern:
- Verify TF tree: base frame, tool frame, target frame.
- Enforce one convention for end-effector pose (right-handed, consistent axis definitions).
- Add a “sanity pose” test: command a known Cartesian offset and verify expected joint motion direction.
3) IK flips near singularities
Symptom: arm jumps between two valid IK solutions when you drag the marker.
Fix pattern:
- Seed IK with the previous joint solution.
- Add joint-limit weighting and continuity constraints.
- If you’re going AI-first later, you still want a stable classical baseline to compare against.
4) Control rate mismatch (jittery or laggy tracking)
Symptom: arm lags behind marker, oscillates, or looks unstable.
Fix pattern:
- Decide an explicit control rate (e.g., 50–200 Hz) and stick to it.
- Time-step Genesis consistently.
- Add smoothing on goal pose updates (low-pass filter) if humans are dragging markers.
Turning this into an AI-ready robotics workflow
A good simulation demo becomes a lead-generating asset when it’s repeatable, measurable, and extensible to AI. Here’s what I’d add next if you’re building toward smarter automation.
Add metrics: make “it works” measurable
Pick 3 numbers and track them every run:
- End-effector position error (mm) over time
- Settling time (s) after a goal change
- Trajectory smoothness, e.g., peak joint acceleration or jerk
Once you can measure these, you can evaluate whether an AI controller is actually better than your baseline.
Record data for training and debugging
Even if you’re not training a model yet, start recording:
- Joint states (position/velocity/effort)
- Commanded targets
- End-effector pose
- Optional: contact events, gripper state
This becomes your dataset for:
- Imitation learning (“copy the operator’s motion from RViz”)
- Offline tuning and anomaly detection
- Regression tests (“the new controller must beat last week’s error curve”)
Use simulation to test manufacturing/logistics scenarios
A single arm is rarely deployed alone. The practical targets are:
- Bin picking and tote unloading (logistics)
- Pick-and-place into fixtures (manufacturing)
- Simple machine tending (CNC load/unload)
In each case, simulation should include:
- Realistic workspace constraints (guarding, bins, fixtures)
- Collision geometry that matches the cell
- A task-level success metric (cycle time, drop rate, collision count)
If your simulation environment doesn’t represent constraints, your AI model learns the wrong habits.
ROS 2 reality check (because Noetic is EOL)
The source post triggered the right question from the community: “Is there a ROS 2 version?” That’s the practical concern for teams starting now.
Here’s my stance: don’t start new long-lived work on Noetic unless you’re forced by a vendor stack. If you need longevity, aim for ROS 2 (commonly Humble or Jazzy in modern deployments) and port the architecture rather than clinging to the exact implementation.
A clean migration plan looks like this:
- Keep the robot description (URDF/Xacro) portable.
- Replace
catkin_makepackages withcolconequivalents. - Use
ros2_controlconcepts where possible for controller structure. - Keep Genesis integration as a simulator “backend” that can publish/subscribe to ROS 2 topics.
Even if the demo code is Noetic today, you can still apply the design: RViz goal → kinematics → controller bridge → simulator.
Where this fits in the “AI in Robotics & Automation” series
This post is part of a broader pattern you’ll see across AI-enabled robotics projects: AI doesn’t replace foundations—it punishes weak foundations. If your simulation/control loop is unstable, you won’t get reliable training, and you won’t trust what you deploy.
Genesis + ROS + RViz gives you a practical starting point for single-arm robotics simulation that’s immediately useful for manufacturing and logistics teams. The next step is deciding what intelligence you want to add—perception, planning, or low-level control—and building it behind stable interfaces.
If you’re evaluating AI-driven simulation and control for a real automation project, the fastest way to get traction is to define one pilot task (pick-and-place, bin pick, or machine tending), instrument it with metrics, and iterate in simulation until the numbers stop moving.
Where do you want the “smarts” to live in your arm stack—AI-assisted perception, AI motion generation, or an end-to-end policy?